Unmasking the Power of Dry Ice: Innovative Experiments for Science Enthusiasts

Imagine entering the chilling, enigmatic realm of dry ice. Ever been captivated by the smoky mystery swirling from a witch's cauldron in your favorite horror flick? That's the enthralling effect of dry ice! But, what is this intriguing component, and how is it typically used?
Essentially, dry ice is the solid form of carbon dioxide (CO2), a gas we exhale every time we breathe. It's called 'dry' because it skips the liquid phase and sublimates directly into gas, a process that's as intriguing as it sounds. In the everyday world, you'll find dry ice making its magic in everything from preserving food in coolers to creating smoke effects in theatres and concerts.
Is interaction with dry ice considered risky? Well, it's a little complicated. Dry ice can be perfectly safe when treated with respect, but hazardous if it's not handled appropriately. Fear not, we will shed light on the right ways to handle, store, and utilize dry ice for various scientific experiments. Ready to unravel the enigma of dry ice?
Entering the freezing world of dry ice experiments, we must always keep one golden rule in mind: safety first. Is it dangerous, you ask? It's not a harmless fluff ball. With temperatures plummeting to -78.5 degrees Celsius, it could lead to frostbite or burns if it touches the skin. How to handle dry ice safely? Treat it like a delicate piece of art in a gallery, with extreme care and suitable equipment.
Picture yourself as a scientist, armed with insulated gloves and safety goggles, ready to unveil the power of dry ice. But remember, this isn't just about donning the right gear. Knowing how to store dry ice is equally crucial. It sublimates, meaning it turns directly from a solid to a gas. Therefore, it should be stored in an insulated container, but never in a completely sealed one, to avoid pressure build-up and potential explosion.
Are you geared up to step into the realm of inventive experiments with dry ice, equipped with knowledge and due precautions? Let's set forth on this icy journey, but bear in mind, safety is not a mere suggestion - it's a mandatory rule.
Prior to plunging into the thrilling world of dry ice experiments, it's essential to ensure that you're adequately protected with the required safety gear. Here's a useful checklist to assist you in getting prepared:
Now that you're equipped with the necessary safety gear, let's move on to the fascinating experiments you can perform with dry ice.
Having learned about the features and safety measures for dealing with dry ice, we can venture into our first experiment. Here's an in-depth guide on crafting a dry ice bubble:


Learn more about 🔬 Creating a Dry Ice Bubble: A Step-by-Step Guide or discover other Dry Icy guides.
Congratulations! You've successfully created a dry ice bubble. This experiment not only demonstrates the fascinating properties of dry ice but also makes for a great visual spectacle. Next, let's take a look at the resulting bubble from our experiment.

Having witnessed the outcome of the dry ice bubble experiment, let's enhance our comprehension by watching a video that breaks down the process.
That was an interesting demonstration of the dry ice bubble experiment, wasn't it? Now, let's proceed to our next experiment - creating comets at home using dry ice.
After getting acquainted with the basics of dry ice and safety measures, it's time for the exciting part - the experiment! Here's an easy guide on how you can bring a miniature comet to life right in the comfort of your kitchen.


Learn more about Crafting Mini Comets with Dry Ice: A Step-by-Step Guide or discover other Dry Icy guides.
Congratulations! You've just created a mini comet using dry ice. Remember to handle your comet with care and always prioritize safety when conducting experiments with dry ice. Stay tuned for our next experiment!

We've just visualized the appearance of a dry ice comet, now let's enhance our understanding with a video demonstration. This would surely heighten your anticipation and knowledge for when you carry out the experiment yourself.
Isn't it fascinating how a miniature comet can be created using dry ice? With careful handling and correct procedures, you too can recreate this experiment. Now, let's move on to our next experiment where we create smoke rings using dry ice.
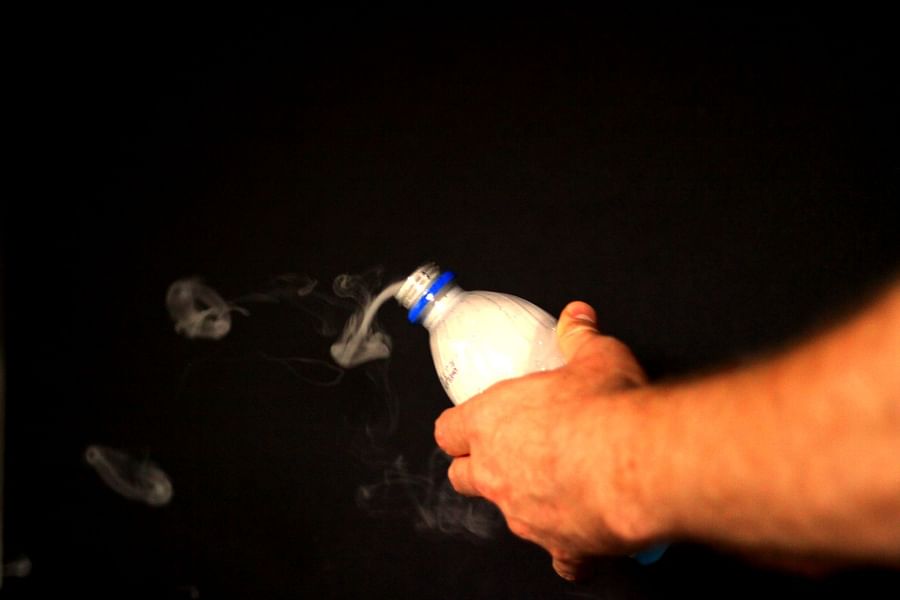
Having unravelled the science of dry ice, we move on to our third experiment. This guide will assist you in conjuring mystical smoke rings with dry ice. Remember, safety is our top priority, so adhere to the precautions outlined at every stage.


Learn more about 🌬️ Creating Smoke Rings with Dry Ice: A Step-by-Step Guide 🧪 or discover other Dry Icy guides.
And voila! You have successfully created smoke rings using dry ice. This experiment is not only fun but also a great way to understand the properties of dry ice and its interaction with the environment. Up next, we have an image of the smoke rings created during this experiment.
After observing the fascinating outcome of the dry ice smoke rings experiment, let's enhance our understanding with a video demonstration. This SpanglerScienceTV video does an amazing job of not only presenting the experiment, but also shares valuable insights on procuring and safely handling dry ice.
Witnessing the magic of dry ice in these simple experiments, we're ready to step up our game with some more advanced experiments designed for science enthusiasts. Be mindful, safety always comes first!
Having skimmed the surface of the frosty world of dry ice, are you thrilled to discover more? There's certainly more to this fascinating substance than meets the eye. Let's embark on an exciting journey into the territory of advanced dry ice experiments. This is a task designed for the brave and curious, not for the lighthearted.
Is dry ice dangerous? Absolutely, if not handled with care. But don't let that deter you. With the right safety precautions, you can harness the full power of dry ice for some truly innovative science experiments. Remember, safety is paramount. Gloves, goggles, and a keen understanding of dry ice safety precautions are your ticket to this frosty adventure.
Eager to probe the mysteries of the unknown? Excited to challenge the limits of what a simple block of frozen carbon dioxide can do? Then fasten your seatbelts, fellow science enthusiasts. We're heading into the most exciting leg of our journey: the advanced experiments with dry ice!
Let's see how well you understood the article and the fascinating properties of dry ice. Are you ready?
And there you have it, fellow explorers of the icy unknown - a whirlwind journey into the heart of the amazing power of dry ice. We've blown bubbles that shamed the mightiest soap, crafted comets in our kitchens, and painted the air with smoke rings that would make a dragon jealous. But remember, while dry ice gushes with potential for innovative science experiments, it's not all fun and games.
Is dry ice dangerous? In a word - yes. When not handled with respect and the proper safety precautions, dry ice can indeed be harmful. That's why we've emphasized on how to handle dry ice and how to store dry ice throughout our frosty adventure. Because, science without safety is like a comet without a tail - it just isn't right!
What does the future hold? Will you plunge further into the compelling world of dry ice, or maybe venture out to explore other scientific marvels? Regardless of your choice, let our newfound knowledge lead us - responsibly - towards new discoveries. After all, the world is nothing but a giant lab for our curious minds!
Before we part, let's hear from you. Which of these experiments sparked your curiosity the most? Catch our community poll and cast your vote. Until next time, keep exploring, keep experimenting, but above all, stay safe!
We've covered some fascinating experiments with dry ice in this article. Now, we want to know: which one are you most excited to try out? Cast your vote and let's see which experiment is the community favorite!

Liam Thornton is a tech enthusiast and a former software engineer. He enjoys exploring the latest trends in technology, particularly in the fields of artificial intelligence and cybersecurity.
All Rights Reserved © 2025


Post a comment